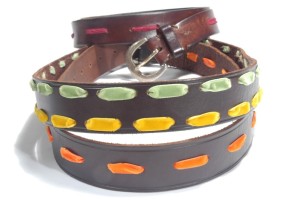
Altering belts is quick and simple. For this design we punched holes in an old belt and wove velvet ribbon through the holes. This project can be made in under 30 min.
Supplies:
Leather Belt
Sharpie
Circle leather punch (we set ours to the largest hole)
1/2” Velvet ribbon (the length of the belt plus 2”)
Fabri-Tac
Masking tape
Steps:
1. With a sharpie, mark points along the belt about an inch apart.
2. Using a leather punch, punch holes on the marks down the center of the belt. (or along the top and bottom edges)
3. Weaving the Ribbon: Pinch the end of the piece of velvet and wrap it with a piece of tape, like a shoelace. (this will help you when weaving) Begin on the backside of the belt and pull the velvet ribbon through the first hole, leaving a ½” tail. Continue weaving the velvet ribbon through the holes. If there is extra ribbon when you get to the end, just cut it off. Use Fabri-Tac glue to glue the ends of the ribbon to the backside of the belt.
We have a new facebook fan page…..Please join us there! Cathie and Steve Facebook


Hello Cathie, I love your blog and I am an avid crafter too… I am writing to let you know that I posted one of your dog costume photos with the Red Hat on to my Red Hat site. 🙂 I just did it today and credited you for the photo. But was writing to make sure it is ok with you? If not I will remove it. It is so darn cute and our Red hat group loves it… Thank you, Queen Mum Debb
http://www.socialbutterflies.weebly.com/sb-recipes.html