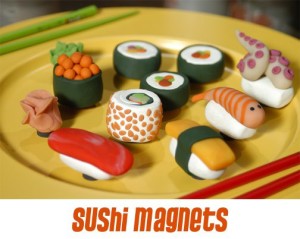
Sushi is so yummy for the tummy and double nice when you get to enjoy it with good friends….but don’t eat this sushi, because it is made from polymer clay. Each piece was “free form” sculpted – so dig into your clay stash and start creating your own designs. I have included some tips and materials needed to get started.
Supplies Used:
images of sushi (available online)
polymer clay in various colors
parchment paper
cookie sheet
oven
heavy-duty glue
small magnets
Steps:
1. Find some photos of sushi for reference when making these magnets — a quick online search can turn up hundreds of examples. Here is a Google Link to sushi images.
2. Knead the clay for a couple of minutes until it’s soft and easy to work with.
3. Using different colors of clay, sculpt small pieces of sushi. Try to capture details like the lines and eyes on a shrimp, the seaweed and sesame seeds in a classic roll-style sushi or the suckers on a piece of octopus. Don’t forget to sculpt some green wasabi and pink pickled ginger as condiments.
Tips:
* Polymer clay may leave a residue on hands. It’s a good idea to clean hands when switching colors to prevent accidental mixing.
* For custom colors, knead two or more colors together until they blend completely. Or, stop partway through the kneading process for a marbled look.
4. Line a cookie sheet with parchment paper and bake the pieces according to the package instructions. Baking times will depend on the thickness of the pieces.
5. Once the sushi has cooled completely, glue a small magnet to the back of each piece with heavy-duty glue. Allow the glue to dry for 24 hours before using.


Those are adorable. I don’t even like sushi, and I love them.
ha ha ha . brilliant!
I think my friends would love those for xmas…so much to do, so little time…thanks for sharing such an inspired idea!