Adding designs and patterns to your next dye project is a breeze with a simple batik technique that’s guaranteed to turn some heads. You will need cookie cutters to make the simple designs.
Materials:
double boiler (or glass bowl and slightly larger saucepan)
prewashed silk scarf
wax
cold-water fabric dye
clothespins
small cookie cutter
plastic tub or metal sink
kraft paper
iron
Steps:
1. Using a glass bowl and a saucepan as a double boiler, heat the wax until it’s melted.
Safety tip: Be sure to tilt the inner container; otherwise a vacuum could form and you could receive a nasty burn.
2. Clip the clothespin to the side of the cookie cutter and dip the cookie cutter into the wax for at least 20 seconds.
3. Place the wax-dipped cookie cutter onto the scarf and press lightly until the wax is transferred to the scarf. Allow the wax to cool.
4. Mix the dye (following package instructions) in a large tub or a metal sink. Wet the scarf and place it in the dye bath; stir and let the fabric sit in the dye for about an hour.
5. Rinse the scarf in cold water until the water runs clear; hang the scarf to dry.
6. Place the fabric between pieces of kraft paper and press with a hot iron to remove the wax.
7. Rinse in hot water with a mild detergent to remove remaining wax, then let the scarf hang to dry.

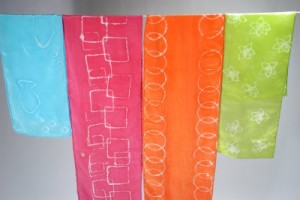







Nice tips, thanks for sharing. Love the orange and green patterns.
This comment has been removed by a blog administrator.
Thanks for the tutorial, it’s very clear.
I’m batik lover. I would love to make batik silk scarves.